Previously this guide was only on using nguid with the Resharper extensions, I have extended it to include C# Interactive, which you can use without any extensions.
Using Resharper
There is a simple trick using Resharper where you can easily create a new Guid directly in Visual Studio. Using Google I had a hard time finding this trick - but I have known it for years. So I thought that I might as well share it. This requires Resharper and a valid licence for this.
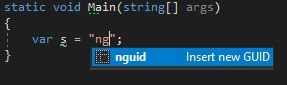
You can use the command "nguid" in order to create a new Guid. It is invoked by typing "nguid" or just by starting to type it (below I am only typing "ng"). This will give the below dialog:
If you hit tab or enter you will see GUIDs displayed:
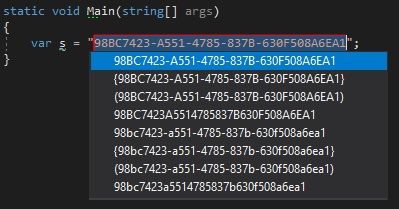
You can then choose the GUID and format that you like. This is very easy to use. There is no reason to go to online GUID generators or the like, as this comes built into Resharper.
Using C# Interactive
C# Interactive is a REPL Editor, i.e. Read-Evaluate-Print-Loop with an advanced editor. With the C# Interactive window, we can test our code snippet without compiling or running the complete code.
Using this we can execute the usual Guid.NewGuid() command within Visual Studio to get a GUID. To find C# interactive you simply open up C# interactive using quicklaunch or go to View > Other windows > C# interactive. You can then write Guid.NewGuid() to get a GUID:
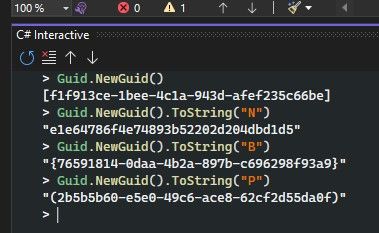
As you can see above you can use any of the GUID formats provided by the Guid.ToString() method. For example Guid.NewGuid().ToString("N") to get a GUID without hyphens.
That is it!
I hope this helped you to easily get a new GUID in Visual Studio, feel free to leave a comment down below!